Finishing Your Basement? The “Foundation First” Checklist
/A finished basement can transform your home, adding valuable living space, increasing property value, and giving you flexibility for everything from rental income to family recreation. But before you start picking paint colours or flooring, there’s a critical step that too many Niagara homeowners overlook: ensuring the foundation is ready for finishing.
Skipping this step can turn your dream renovation into a costly disaster. That’s why any successful project should begin with a thorough basement renovation checklist focused on structural integrity and moisture control.
The Nightmare Scenario: Ruining a $50k Renovation
Imagine investing $50,000 into a beautifully finished basement, complete with drywall, flooring, a bathroom, and maybe even a guest bedroom. Everything looks perfect for a few months… until it doesn’t.
A musty smell creeps in. Then you notice bubbling paint. Soon after, warped baseboards and damp carpeting. When you finally open up a wall, you discover mould spreading behind the drywall and moisture seeping through the foundation.
This scenario is more common than most homeowners realize. The root cause? Skipping a proper pre-finishing foundation inspection and failing to address moisture issues before closing everything in.
Once the basement is finished, access to the foundation becomes limited and expensive. Fixing issues afterward often means tearing out walls, flooring, and insulation—essentially undoing your entire investment.
The takeaway is simple: your basement is only as good as the foundation behind it.
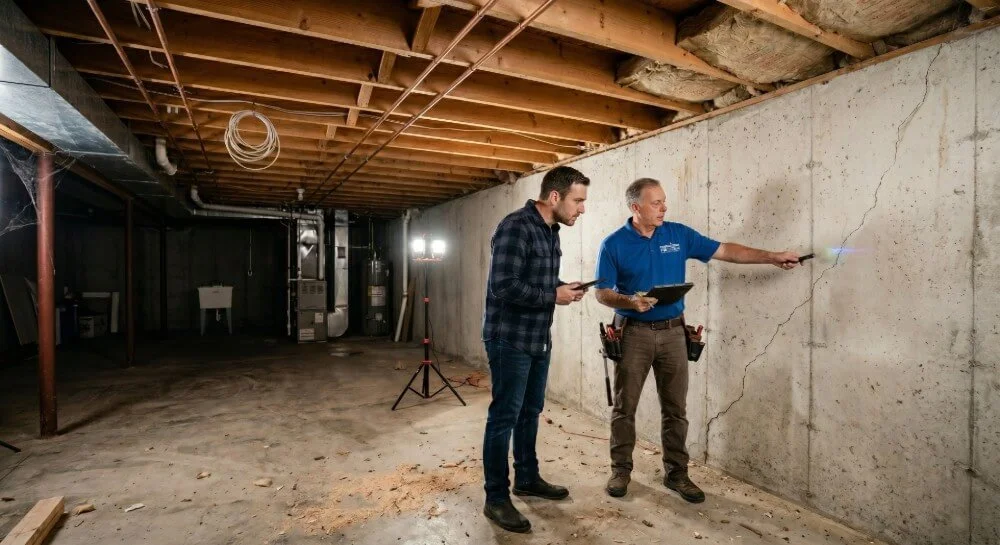
The “Foundation First” Inspection Checklist
Before you begin framing or installing finishes, you need a detailed inspection process tailored to Canadian homes and climate conditions. This checklist is designed to help homeowners and contractors identify potential problems early, when they’re still manageable and affordable.
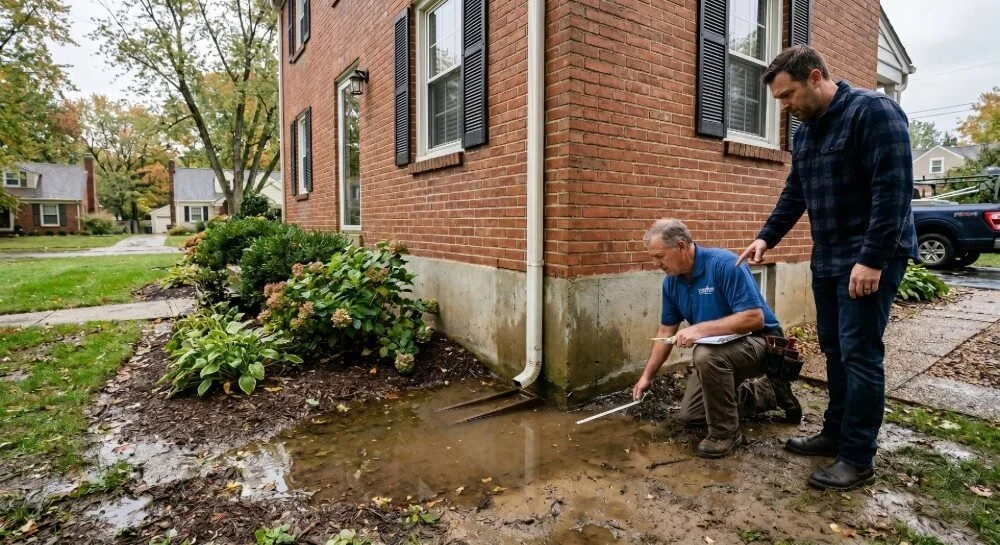
1. The “15-Minute Rain Check”
Start outside. Water management begins at the exterior, and poor drainage is one of the leading causes of basement moisture issues.
During or shortly after a rainfall, take 15 minutes to walk around your home and observe how water behaves.
Look for:
Pooling water near the foundation
Downspouts discharging too close to the house
Improper grading (ground sloping toward the foundation instead of away)
Overflowing or clogged gutters
Water should always be directed away from your home. Downspouts should extend at least 6–10 feet from the foundation. If they don’t, you’re increasing the risk of water infiltration.
Fixing drainage issues is often simple and inexpensive compared to interior repairs. Regrading soil or extending downspouts can prevent thousands of dollars in damage later.
2. Inspecting for Hairline Cracks
Once exterior drainage is addressed, move inside and carefully inspect your foundation walls.
Hairline cracks may seem harmless, but they can allow moisture to seep in over time. Before you install framing, insulation, or drywall, you need full visibility of these surfaces.
Pay attention to:
Vertical cracks (often caused by settling)
Horizontal cracks (more serious can indicate structural pressure)
Diagonal cracks near corners or windows
Mark any cracks you find and monitor them. If they widen or show signs of water intrusion, they need to be repaired before proceeding.
Sealing cracks with appropriate materials is part of a proper pre-finishing foundation inspection, and it’s essential for long-term durability.
Remember: once you begin framing basement wall moisture barrier systems, these cracks will be hidden and much harder to address.
3. The Floor Check: Heaving or Dampness?
Your basement floor is just as important as your walls. Before installing flooring, conduct a thorough inspection of the concrete slab.
Check for:
Uneven surfaces or heaving
Visible cracks
Damp spots or discoloration
Efflorescence (white powdery residue indicating moisture movement)
A simple test for moisture is taping a square of plastic to the floor and leaving it for 24–48 hours. If condensation forms underneath, you likely have moisture vapour rising through the slab.
In this case, sealing basement floor surfaces becomes critical. Applying a proper vapour barrier or sealant helps prevent moisture from damaging flooring materials like laminate, vinyl, or carpet.
Ignoring floor moisture can lead to warped flooring, mould growth, and unpleasant odours.

4. Egress Windows: Are They Code Compliant for a Bedroom?
If your basement renovation includes a bedroom, you must ensure your egress windows meet building code requirements.
An egress window serves as an emergency exit and must meet minimum size and accessibility standards. These regulations are strictly enforced in Canada for safety reasons.
Key considerations include:
Minimum opening size
Maximum sill height from the floor
Ease of opening without tools
Clear access to the outside (no obstructions)
If your current windows don’t meet code, you’ll need to upgrade them before finishing. This is also the time to confirm requirements for a St. Catharines building permit or similar municipal approvals, depending on your location.
Failing to meet code can result in fines, failed inspections, or even the inability to legally classify the space as a bedroom.
Why You Need a Sump Pump (Even if You’ve Never Flooded)
Many homeowners assume that if their basement has never flooded, they don’t need a sump pump. Unfortunately, that assumption can be risky.
Weather patterns are becoming less predictable, and heavy rainfall events are increasing in many parts of Canada. A sump pump acts as a safety net, removing water that accumulates around your foundation before it can enter your basement.
Even if your home has historically been dry, finishing your basement changes the equation. You’re adding materials like wood framing, insulation, and drywall, all of which are vulnerable to water damage.
Installing a sump pump:
Provides peace of mind during heavy storms
Helps manage groundwater pressure
Reduces the risk of sudden flooding
Protects your renovation investment
Modern sump systems can also include battery backups, ensuring they function even during power outages, when they’re often needed most.
Think of it as insurance for your finished space.
Waterproofing from the Inside: The Renovator’s Insurance Policy
Exterior waterproofing is ideal, but it’s not always feasible, especially for existing homes. That’s where interior waterproofing solutions come into play.
Interior waterproofing focuses on managing water that enters the basement and directing it safely away before it causes damage.
Key strategies include:
Interior Drainage Systems
These systems collect water along the perimeter of the basement and channel it to a sump pump. They’re highly effective at preventing water buildup behind walls.
Vapour Barriers and Moisture Control
When framing basement walls moisture barrier systems, it’s essential to include proper vapor barriers. These prevent moisture from migrating into insulation and drywall.
This step is crucial for avoiding mold behind drywall, which can develop silently and pose health risks.
Wall Sealants
Applying waterproof coatings to foundation walls adds an extra layer of protection against moisture intrusion.
Smart Material Choices
Use moisture-resistant materials wherever possible:
Rigid foam insulation instead of fiberglass
Mould-resistant drywall
Vinyl or tile flooring instead of carpet in high-risk areas
Interior waterproofing doesn’t just protect your basement; it extends the lifespan of your entire renovation.
Bringing It All Together
Finishing a basement is one of the most rewarding upgrades you can make to your home—but only if it’s done right from the start.
A solid basement renovation checklist begins with what you don’t see: the foundation, drainage, and moisture control systems that keep your space dry and safe.
By prioritizing a thorough pre-finishing foundation inspection, addressing cracks and dampness, ensuring proper drainage, and investing in waterproofing measures, you set your project up for long-term success.
Don’t forget essential steps like:
Sealing basement floor surfaces
Installing proper moisture barriers when framing
Planning for rough-in plumbing if adding a bathroom
Verifying code compliance for windows and permits
Taking proactive steps toward avoiding mould behind drywall
Contact Foundation Fix Today
Cutting corners at this stage can cost you exponentially more down the line. But doing it right? That’s how you turn your basement into a space that’s not only beautiful, but built to last.
If you’re planning a renovation in the Niagara region or St. Catharines, start with the foundation. Everything else depends on it. Contact Foundation Fix today to discuss foundation solutions for your home.


